I will explain how I upgraded my Intel NUC ( NUC8i5BEH ) from a 1TB SSD to a 2TB M.2 NVMe. This should work with any Intel NUC as long as you meet the assumptions.
Method: Utilising Clonezilla to clone and expand a 1TB SSD DAppnode install onto a 2TB M2. NVMe
Assumptions:
You have a INTEL NUC with a spare SSD or M2. NVMe slot.
Using DAppNode ISO (though should work with other installations)
Requirements:
USB thumb drive to boot Clonezilla
New SSD or M.2 NVMe hard drive
If you are unsure of what drive to get. Intel provides list of validated hard drives.
Scroll down till you find your model NUC. The list isn’t all inclusive, I bought a newer 970 Evo plus than the model listed and it worked fine.
Note
You may not want to upgrade your drive yet. You could try pruning the database to free up some space as detailed here.
Another options is to add a secondary drive and move the docker images over. The FAQ details how to do this under the heading " How to mount docker data on a different SSD?"
One more option is to look at LVM.
If you are wanting to move forward then forget these options and continue.
Steps:
Check issues detailed below.
Properly shutdown your DAppnode System and containers.
Install your new hard drive in the Intel NUC. You may want to download the Intel NUC User Guide for detailed instructions. Here is the guide for my model
Install Clonezilla on your USB drive as detailed here
Plug the USB drive into your Intel NUC and boot the system. If CloneZilla doesn’t boot, restart the NUC and press f2 to enter bios. From there you can boot the USB or change the boot priority/order to boot the USB first.
After CloneZilla starts follow the step-by-step guide here.
Once you get to the “Choose the mode to run the following wizard about advanced parameters:” menu select Expert.
From expert mode follow this step-by-step guide here
> You need to use the -k1 parameter. This will expand your partition after cloning.
Follow both guides until it has completed. In the last step choose to shutdown the system.
Disconnect the Intel NUC and remove the old hard drive. If you are unsure how, follow the instruction in the Intel NUC User Guide.
remove the USB and boot the new system.
All being successful you should now have DAppnode running on a new hard drive.
Optional:
You may want to upgrade DAppnode from command line. After successful upgrade.
Docker version too old and didn’t support cgroups v2
After cloning and rebooting onto the new hard drive I had the following issue when starting the DAppnode containers.
“Cannot start service api: OCI runtime create failed: container_linux.go:345: starting container process caused "process_linux.go:281: applying cgroup configuration for process caused "mountpoint for cgroup not found\”
To fix this problem I upgraded Docker to version 20.10 as details here.
I suggest checking your docker version prior to upgrading.
You will need to be utilising command line. So either login from a terminal or via SSH.
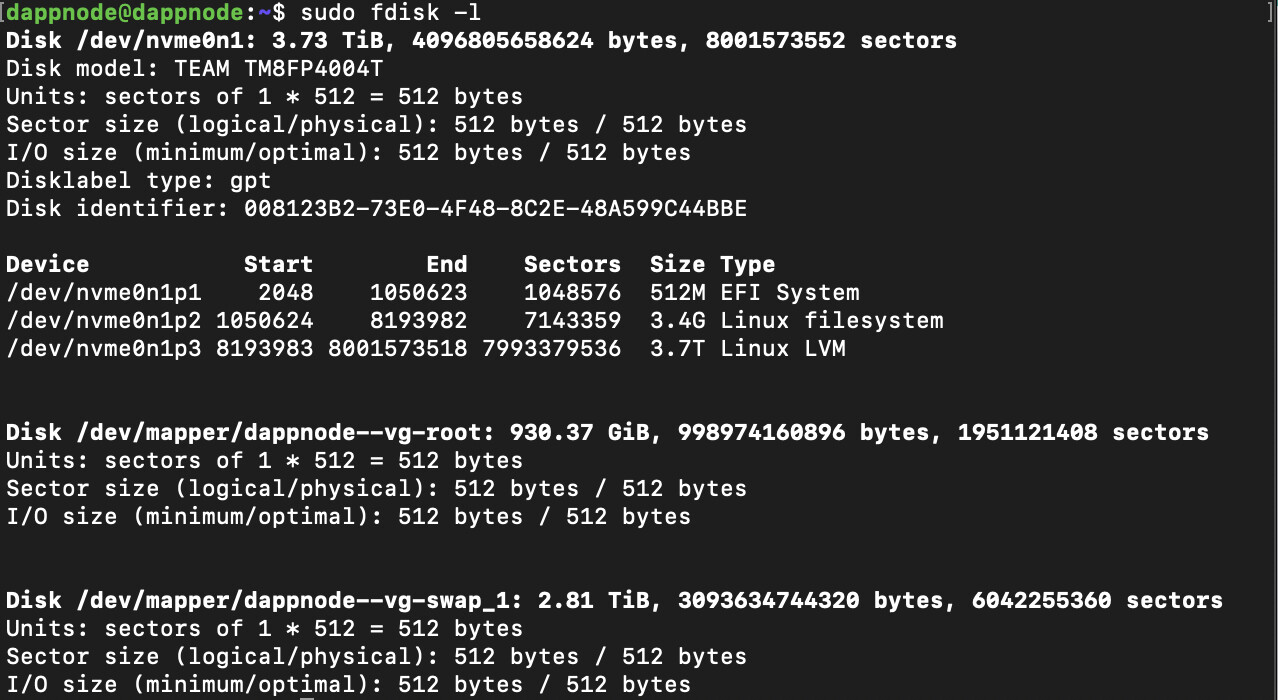
Hey I followed the guide and everything cloned properly but my new storage space is showing the maximum of my old storage space. Anything else I need to configure? I did set the -k1 parameter as well so I am not sure what else is needed?
Same problem as mentioned by @bashastaker, after booting up the new drive main partition is still the same logical size as previously. I did check in the terminal using df -h and it also reports that the third partition is a little less than 1TB instead of 2TB. I have also tried to extend the partition with GParted and no luck either.
@dylan I am running an Intel NUC10i5FNK, switched from a WD Blue SN550 1TB to a 2TB, NUC only has a single slot, I used an external NVMe SSD enclosure to do the cloning.
Instructions provided by @abendigo helped me resolve the issue. Had to use the following commands to manipulate the LVM:
List physical volumes
sudo pvdisplay
Resize physical volume
sudo pvresize $PHYSICAL_VOLUME
List logical volumes
sudo lvdisplay
Resize logical volume
sudo lvextend -l +100%FREE $LOGICAL_VOLUME
List filesystem path
sudo blkid
Resize filesystem
sudo resize2fs $ROOT_FILESYSTEM
Thanks very much @dylan and @abendigo for the tutorial and help
No worries i’m glad that resolved your issue. For others using LVM and would like to expand the LVM to include a second drive. Weiuohg provided a good link on how to do this. See the note section.
I managed to pull this off yesterday but I used an offline Nvme duplicator to clone my drive. In addition to ucodia’s steps above I first made sure my docker was updated from the UI, then from ssh…
sudo apt-get install parted
sudo parted —pretend-input-tty /dev/nvme0n1 resizepart 3 100%
sudo partprobe
…then follow ucodia’s commands substituting my disks/partitions at the end of $ commands (nvme0n1/nvme0n1p3). I followed this for help with the parted disk expansion since I didn’t use clonezilla https://www.ryadel.com/en/linux-resize-extend-disk-partition-unallocated-space-centos-rhel-ubuntu-debian-vm/ but couldn’t get partx to install so used partprobe from parted instead.
Would the same (or similar) process work for a NUC with only one M2. NVMe slot and an external SSD?
My situation:
Objective: upgrade from my 1TB NVMe to a 4TB NVMe
Hardware:
I have a NUC i7-10710U, which only has a single NVMe slot
I also have a spare 2TB external SSD that I can clean out and use to help
I don’t have a ton of experience with this kind of stuff, but my naive hope is that I can clone twice using the CloneZilla guide you present. Basically like this:
I was able to get everything cloned, but am running into the partition size issues @ucodia and @abendigo also ran into. I have tried following their helpful instructions, but can’t get the volume to expand.
I’ve also tried expanding the disk from dappnode’s UI, but that is erroring out too.
I’d appreciate any thoughts or help
EDIT: resolved!
Turns out the swap space had been erroneously extended (by me), so I needed to reduce that size and then try out the above instructions again to extend the root. Here are the steps I took;
$ sudo lvreduce /dev/dappnode-vg/swap_1 -L 512M to reduce the swap space (I used 512M as a test, but it seemed to have worked fully )
$ sudo lvextend -l +100%FREE /dev/mapper/dappnode--vg-root to extend the root volume to take up the free space – this worked, extending it to 3.7T!
$ sudo resize2fs /dev/dappnode-vg/root to extend the root file system size


 )
)